It is often the small things which make a difference in an application; or at least in the end users opinion of the application. In this case, it is as small as a single space, just a bit of padding, room to breath!
Although this article talks about FontAwesome the functionality used is nothing to do with it; it just becomes a bit more evident when using a web-based icon library such as FontAwesome.
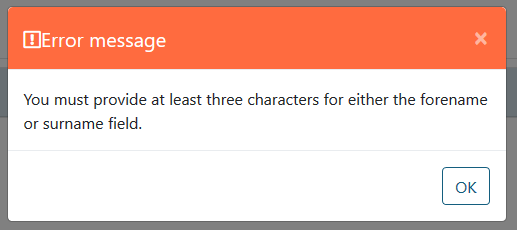
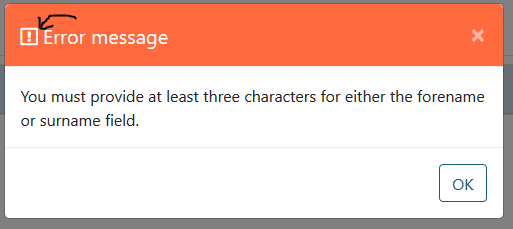
The icon in the above screenshot is a standard FontAwesome icon with no special treatment; it is a little to close to the text for my liking, it cluttered (it can also confuse a screen reader). However, the icon in the next screenshot is ever so slightly further away, but the code is the same.
This has been achieved with a little known line of CSS wizardry; the ‘after’ attribute.
i:after{
	content: " ";
	white-space: pre;
}
The above lines of CSS tell the browser to render a single space after and “i tag”, this automatically gives us the extra bit of space without the need to add it to every icon we use. Magic!
Once you realise the “after” attribute exists you can use it for all sorts of things, like adding a colon to the end of your labels rather than having to dirty the MVC attributes with them! The possibilities are endless (well not really, the attribute won’t feed you or solve world peace).
label[for]:after {
	content: ":";
}
Thank you to NASA for the header image on this post provided via Unsplash.
It is an error that every developer is more than used to seeing; the application failed because a SQL database permission was missing. It is also a simple error to fix; just grant the permission (after following your firms strict audit processes, obviously!). The problem is knowing that it happened; if the application is ‘out there with the users’ you might not have a useful error message displayed, or the true error may lay several layers deep in your application stack. There is a quick and dirty solution to your problem!
Detecting SQL Permission Errors with SQL Server Profiler
SQL Server Profiler is a tool often installed along with SQL Server Management Studio (SSMS), or you can find it on the SQL Server itself. It allows you to ‘watch’ the queries that are occurring on your SQL Server; by default, it shows all traffic (queries, connections, errors, etc) and can be very noisy. You can, however, place filters on its datasets to only obtain information important to you; such as error 229 “Permission Denied”.
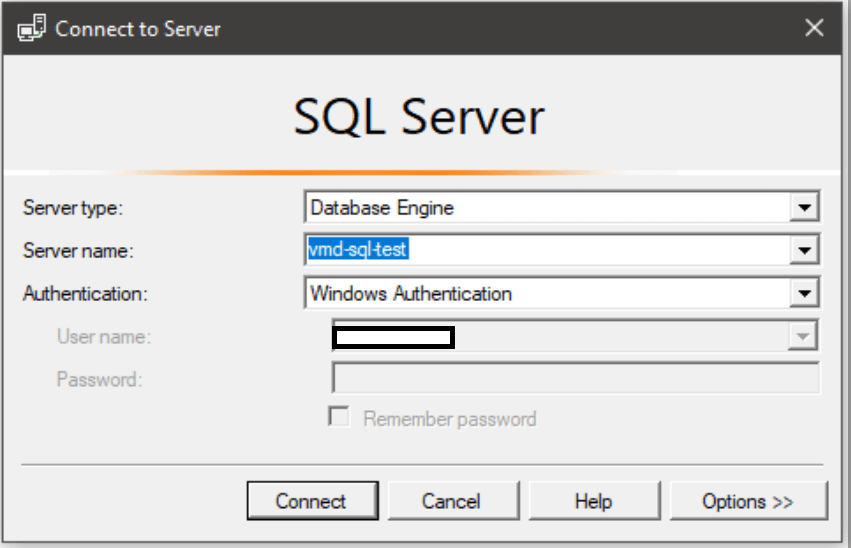
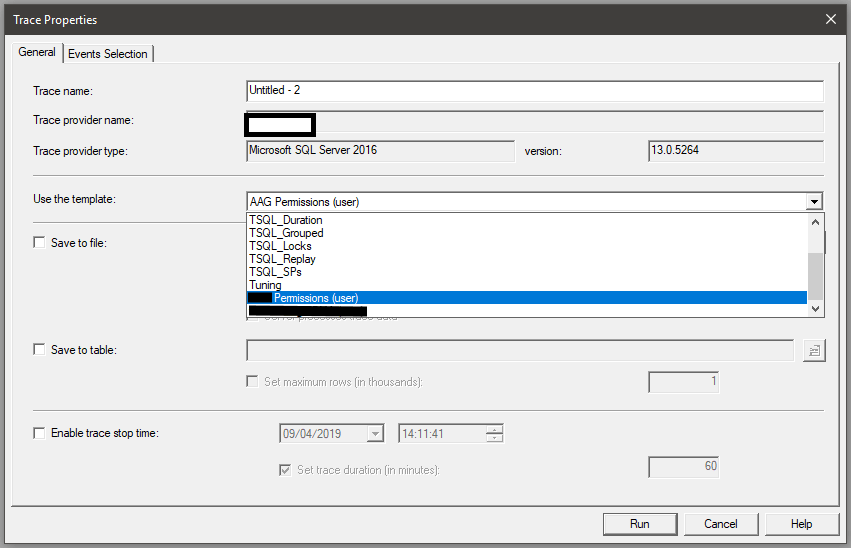
Start SQL Profiler and connect to your SQL Database server, this will not actually start a trace so don’t be worried about affecting performance yet!
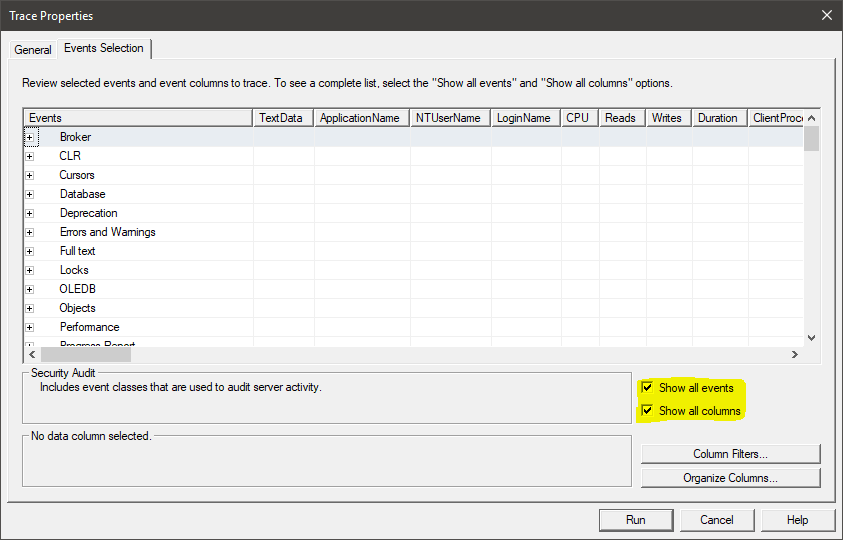
When the ‘trace properties’ window opens, switch to the ‘Events Selection’ tab and tick the “show all events” and “show all columns” boxes. This will allow us to filter our results to the error we care about in the next step.
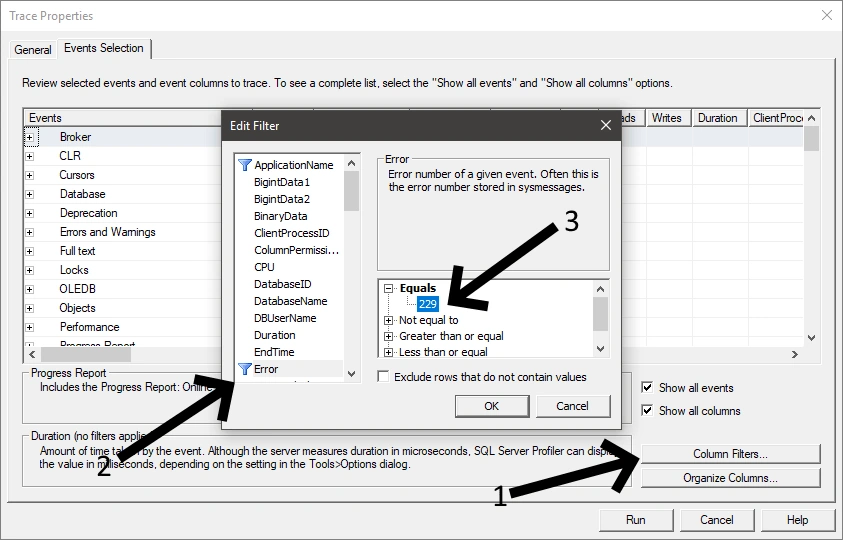
Click the ‘Column Filters’ button and scroll down to the ‘Error’ type and enter ‘229’ into the equals filter.
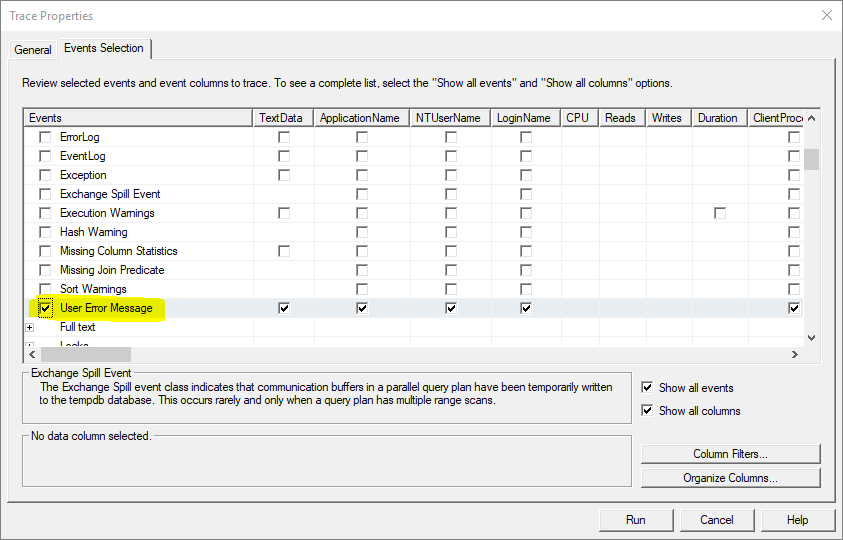
Now scroll down the big list of events until you find “Errors and Warnings” section, expand it and find (and tick) the ‘User Error Message’ box.
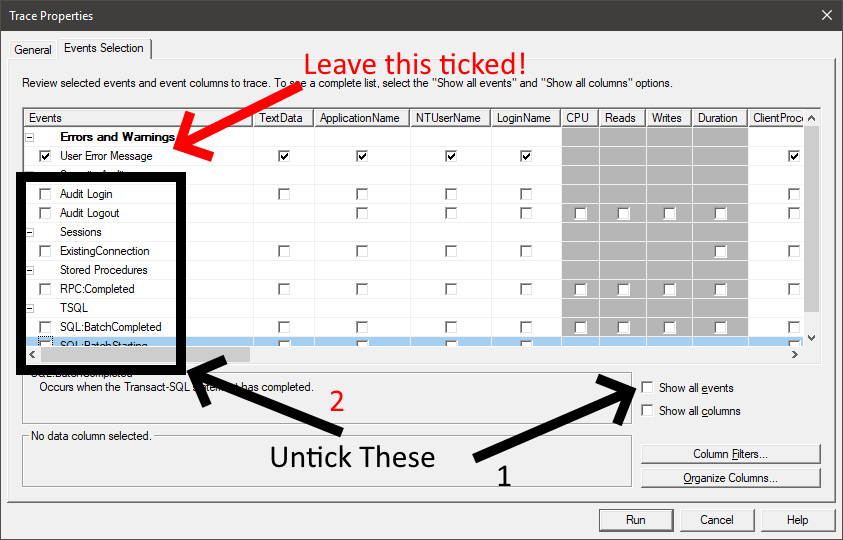
Now that you have filtered the results down to the error message in question; you will want to remove all the default information the trace provides, if only to clean up the results! Untick the two boxes we ticked in step 2 (the show all boxes); and then untick all the other checkboxes in the events selection.
Now click RUN and sit back and wait for your permissions errors to occur!
Bonus Points
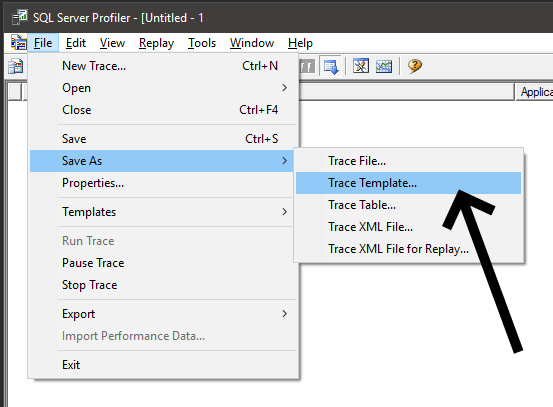
Rather than following the above six steps each time (as much as I am sure you want to revisit this blog post!); you can save your trace as a template for the future. Once your trace is running you can save it as a template for future use; from the file menu pick ‘Save As > Trace Tempalte’.
You can then pick your template from the ‘new trace’ window next time you need it.
Something Important!
SQL Server Traces are very powerful, so naturally they also use up a lot of resources. If you need to run a trace for a prolonged period of time it is sensible to run it directly on the SQL Server (remove the network from the equasion), and filter it as tightly as possible so that the server does not need to return too much information.
As always, please make sure you understand what you are doing, I take no responsiblity for your SQL Servers!
Do not run code you find on the internet on your production systems without testing it somewhere else first. Do not use this code if your vision becomes blurred. If the code runs for more than four hours seek medical attention imediatly. This code has been known (in rare circumstances) to cause one or more of the following: nausea, headaches, high blood preassure, cravings for old-school sweets, and the impluse to reformat tabs into spaces. If this code causes your servers to smoke, seek shelter. Never taunt this code.
The ability to show or hide UI elements based on criteria related to other elements is nothing new; only showing an ‘Other Details’ text box when a drop-down value of ‘Other’ is selected is the bread and butter of many end-user applications. There are a number of ways of doing this in the WPF/XAML/MVVM world, the default is often the use of a property on the ViewModel relating to the visibility (or enabled state) of the UI element in question, and this is how I have been implementing it until now!
The most recent set of screens I have been working on are a lot more complicated than other parts of the application (lots of business logic fields which depend on the values of other fields). Adding lots and lots of ‘IsEnabled’ or ‘IsVisible’ properties (along with their backing fields, and INotifyProperyChanged code) seemed very messy to me, and I felt there must be a better solution. I already use an IValueConverter to convert simple boolean values (FirstNameIsVisible for example) into WPF Visibility values, so I thought I could take that one step further and perform comparisons.
ComparisonToVisibleConverter
A simple binding to a property on your ViewModel or in the case of this example to a property on a selected dropdown list entry grants you the source for the comparison.
The converter in the above code snippet is where all the magic happens; it takes the bound value and the ConverterParameter to perform the comparisons and return a Visibility value.
To allow for an ‘in’ style of comparison the CommandParameter is a string that can if required to contain a double pipe (‘
’) as a separator. The parameter is taken and compared against the bound property (value in the above code). As a catch-all, the converter returns Visible in the case of a failure.
To reference the converter in your XAML code you need to declare it somewhere globaly or in resources local to your view.
This pattern provides for a quick, clean, and easy way to determine a UI Elements visibility based on the value of another element (or a computed value in the ViewModel).
Thank you to Daniil Kuželev for providing the header image for this article for free on Unsplash.
The WPF application I am working on at the moment contains a questionnaire definition system; the user interface for which contains a number of ComboBoxes (drop-down lists). The nature of the application means that some of these ComboBoxes contain a large number of dynamic entries (not hardcoded, they change based on user actions).
I have found that WPF ComboBoxes with a large number of entries; particularly ones which have overridden ToString methods, can take a second or two to ‘drop down’ (display). This is because WPF renders the entire dropdown interface when it opens; this means if you have many entries in the list each one will be rendered regardless of its position in the list. If you have custom logic inside the ToString methods this can present a significant overhead on the UI thread.
The Solution
The quick solution is to use a VirtualizingStackPanel to display the ComboBox items; this has the effect of delaying the rendering of each item until it is needed (when it is scrolled into view). The following code is an example of a VirtualizingStackPanel in use.
There are of course disadvantages to this approach. For example if you had a ComboBox with hundreds of options; but only 10 shown initially, scrolling down by 20 will generate another 10 item containers. When you scroll back up by 10 they will be re-generated regardless of them having already been created. This overhead is less obvious if a user just scrolls to their option and selects it; however, if they start scrolling up and down the performance hit will become more evident.
And before you ask about the header image; you try finding an image that fits with the idea of a ComboBox (or a DROP down)! Thank you to Jimmy Chang for providing the “drop” image on Unsplash.