It has been a while since I have written a post on melodiouscode.net; partly because it has been a busy year, but also because I didn’t fancy sorting out some server problems on my digital ocean droplet. Until now melodiouscode.net was hosted on the Ghost CMS Platform within an Ubuntu Droplet on digital ocean’s infrastructure; proxied through the Cloudflare platform for speed and security.
The image that the “Ghost Droplet” was created from contained an old version of the Lets Encrypt agent; the version of the Ghost install was out of date, and the theme I used didn’t support the new version of Ghost.
The Solution
After undertaking some research into alternative solutions, I decided to try out the Jekyll static site generator; why not go back to basics and have an HTML, Javascript, and CSS website?
Before I jump ahead I want to explain a little about what the components of my new Static MelodiousCode are; if you are just here for the instructions on how to host a Jekyll static site with Azure, Cloudflare, and GitHub skip down to the bottom!
I have been making good use of Azure Functions recently; their simple hosting style makes spinning up micro-services quick and easy whether they be HTTP, Blob, Table, or scheduled triggers. I have been making use of the schedule triggers recently to automate various processes for larger systems (they are substantially cheaper and easier to manage than Virtual Servers); to do so I have needed to make use of model/data layers within the rest of an application stack. Like most good code the other layers of these applications were designed to make use of IOC (Injection of Control) frameworks and DI (Dependency Injection; initially it seemed that IOC and DI were not possible with the Azure Functions platform. However, the addition of the support for Startup classes in Azure Functions v2 allows you to make use of the .NET Core Dependency Injection framework.
Include a Startup Class in your Function
Before you can make use of a Startup Class in your Azure Function you need to reference ‘Microsoft.Azure.Functions.Extensions’; you can reference it via NuGet.
Add a class file to the root of your project named Startup.cs; to ensure that the Functions Project makes use of the start-up code you need to add a few lines to the class file.
using DependencyInjectionFunctions;
using Microsoft.Azure.Functions.Extensions.DependencyInjection;
using Microsoft.Extensions.DependencyInjection;

[assembly: FunctionsStartup(typeof(Startup))]
namespace MyFunctionsApp {

   public class Startup : FunctionsStartup {
      public override void Configure(IFunctionsHostBuilder builder) {
         throw new System.NotImplementedException();
      }
   }
}
By extending FunctionStartup (which in turn implements IWebJobStartup) you ensure that your code is part of the Functions initialisation process.
Register your Dependencies
You can now use the configure method to register your applications dependency requirements using the IFunctionsHostBuilder provided in the Configuration method.
public class Startup : FunctionsStartup {
    public override void Configure(IFunctionsHostBuilder builder) {
       builder.Services.AddSingleton();
       // or one of the other life time options
       // builder.Services.AddTransient();
       // builder.Services.AddScoped();
    }
}
You can now make use of Dependency Injection as you normally would by adding Interface parameters to your class constructors and registering them with the Services collection in your Startup.cs file.
Now that you know how to register dependencies in your Azure Functions Projects you can not go ahead and write better more maintainable micro-services.
Thank you to @sarabakhshi on unsplash.com for providing the header image used in this post for free.
By default Visual Studio creates an entry for each recognised web browser you have installed when you first launch the IDE. We all know that we should be testing our web applications in more than just our favorite browser (after all, our end users may be using any number of browsers).
Visual Studio supports the addition of other browsers; and using this feature you can add other browser modes such as incognito. Why I hear you ask; incognito mode is not just for naughty browsing habits. It also containerised your cookies, and history; so if you are debugging an application that uses an external authentication provider you won’t inherit your existing sessions from other applications (my use case).
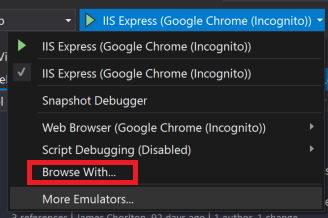
How to add Chrome Incognito Mode to Visual Studio’s Debug Button
Open the ‘browse with’ window from your menu bar (whilst a web application project is open). Strangely this requires your application to build before it will open!
There have been several news articles (and tweets!) recently on the subject of “ring camera hacks”; all of which Google has decided to bring to my attention as I recently did some research (before buying) the ring alarm system. This means that Google feels the need to tell me about every random “news” site that copies and pastes an article about Ring!
Dear news platforms. When someone uses a simple #password for all their stuff, and one of those things gets breached. Then that exposed password gets used to log into their @ring_uk account. That does not mean ring was hacked....
As the tweet above might tell you, Ring has not been hacked (or at least they have not owned up to a hack). At the start of this article, I put the word news in quotes; and I did that on purpose. Most of the websites which have been posting articles about “the hack” can hardly be described as news outlets, they just use sensationalist headings as click-bait to drive advertising revenue. Unfortunately, because these websites get a lot of traffic they also get shared a lot on social media; many of their readers are not experts so take the statements as factual. The problem with inaccurate or fake news is well beyond the subject of this blog post so I shall leave it there, needless to say, it is not always the fault of the reader!
For those who want to read the details; this BBC article is a little nearer to the truth, and is less sensationalist!
What happened in the ring hacks?
The big-ticket article (and each of its copies) in recent days has been the story of a young girl who was verbally abused via a ring camera in her bedroom. I won’t go into the choice of a parent putting an internet-connected camera into a child’s bedroom; that is a parenting decision and I am not a parent.
The so-called “hacker” accessed the ring camera and used it to talk to the young girl in question; he was rude and offensive and frightened the child. Again I won’t go into the subject of legality or morals; the man in question needs to be arrested, but that is my opinion.
This event caused many to claim that the camera was hacked; it wasn’t.
What happened?
Please note I am in no way victim shaming in this article, a nasty thing happened to this family. But others can learn from their mistakes.
As many individuals do, the child’s parent uses the same password across multiple services; perhaps for email, social media, forums, shopping, etc. One of the websites/services that the parent uses was breached; it may have been hacked, or it may have exposed a database online. This breach exposed the password the parent uses (including for their ring account), and an unscrupulous person (I hesitate to use the word hacker here) used it to log into the parent’s ring account.
In reality, the “bad actors” (let us not call them hackers) are not just trying every password from a breach, someone has created a program that can ingest the username-password pairs from many breaches and try them against the Ring login methods; the tool then flags up accounts that use the same password.
How should ring have reacted?
The parent in my example stated that Rings response when she called was “you should have enabled 2FA”; they are not wrong but they could have been better!
Ring is correct in that they have not been hacked in this instance, but they need to realise that most of their users have purchased the system because it is easy to use and requires little in the way of technical knowledge.
A better response would have been:
I am sorry to hear this has happened to you; can I suggest that we first ensure your account is secure with a unique password and multi-factor authentication, to ensure this doesn’t happen again.
Ring can then find out where the bad actor was acting from (System logs etc) and provide this information to the customer for reporting to their police organisation. Simply telling the customer that it is their fault is not overly helpful, even when it is their fault.
How can I protect myself?
When it comes to online security there are some simple rules to follow:
Do not re-use passwords.
Use strong passwords!
Learn about, and enable MFA/2FA for any service that supports it.
Ideally, to help with point one, use a password manager. Such as 1password.
Sign up to haveibeenpwned.com to make sure you know if your details have been exposed in a breach.